
I love fonts. I am obsessed with fonts. In fact, I love fonts more than eating peanut butter cups while watching Josh Holloway on Lost during a Kohl's Big Weekend Sale. Now that is true love.
My obsession began in middle school when my classes required me to include a cover page for my reports. On our home computer, we had Print Shop to satisfy my desire to create a variety of cover pages using a plethora of fonts.
Throughout high school, I simply used the fonts on Microsoft Word for all of my projects. However, during college, I became bored with the few fonts available on my laptop. I found myself walking to the computer labs just so I had more font options. Until recently, I thought I was doomed to the fonts already on my computer. Then, I made a discovery.
The web is full of sites offering free downloaded fonts. I was skeptical about attempting to download these fonts for fear of viruses and disappointment when I couldn't get the font to work. However, downloading fonts to your computer could not be easier. Below is a step-by-step tutorial of how to achieve font greatness.
Step 1: Check out sites that offer free fonts. My personal favorites are DaFont and Free Handwriting Fonts.
DaFont is great because you can browse by alphabetical listing, style, theme, or popularity. They even provide a box for you type a word or phrase, and you can see what that word or phrase looks like in all of their fonts.

Free Handwriting Fonts is right up my alley. They offer super cute fonts that are sure to make you grin.
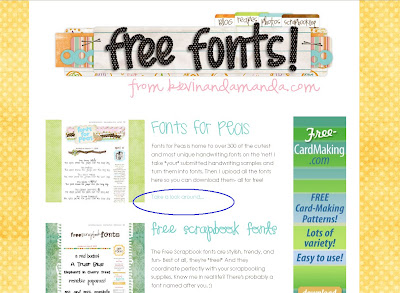

Aren't those two fonts adorable? Please check out their site as they have hundreds of fonts from which to choose. Thank you Kevin and Amanda for providing all of these fonts for free!
Step 2: Find a font you like. If you are using the fonts from Free Handwriting Fonts, click Download Now. Other sites will have a link that says Download.

Step 3: Confirm the download in two easy clicks. A box with the name of your font will appear. All you have to do is click OK.

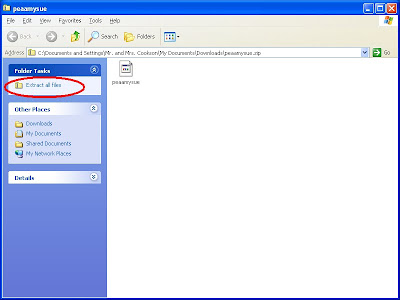
After you click OK, an image like this will appear in your Downloads folder. Double click on the font you just downloaded. In my example, I already downloaded two other fonts, so now I am just going to double click on the first file.

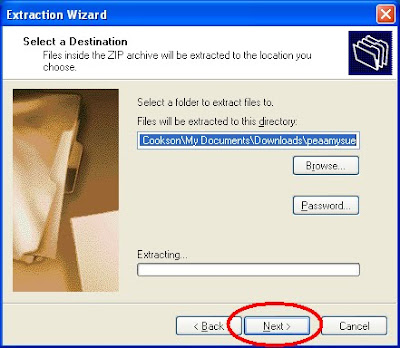
Step 4: Extract all files. Double-click on the link that says Extract all files. Then, click Next once you are in the Extraction Wizard window.

Now you will want to save your font to a destination. My font will be saved in the Downloads folder under My Documents. Click Next. After you click Next, you should see a box that says Extraction Complete. Click Finish.
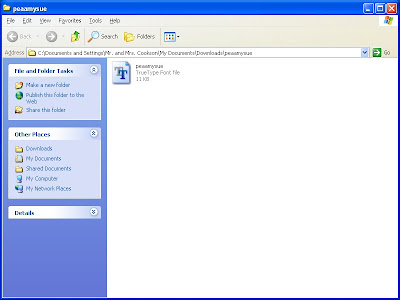
 After you click Finish, you will see a screen that looks like this. Leave this window open. We will use it again later.
Step 5: The Fonts Folder. This is probably the trickiest part of the whole process, but fear not, because with Just a Picture of Home, you will achieve all of your font goals.
Right-click on Start in the lower left-hand corner of your screen, and then click Explore. After you perform these two steps, your screen should look something like this:
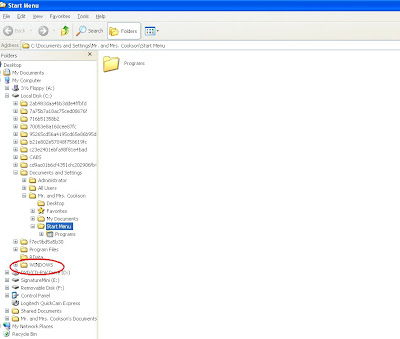
Click on the Windows folder. The computer might tell you that "These files are hidden." That's okay, just click unhide, or whatever you need to do to get them unhidden. Once you can see the folders under Windows, find the folder labeled Fonts, and double-click on it.
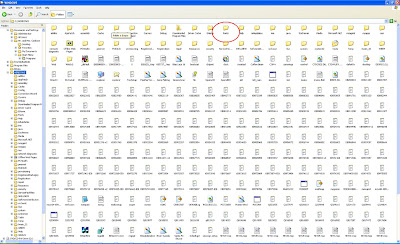
After you double-click on Fonts, you will see every font that is on your computer. It will look something like this:

Remember the window I had you leave open? It is time for that window to come into play. Open that window and place it next to the window that shows all of your fonts (the one that is pictured above). Click on your font and drag it over to the window that shows all the fonts. After you drag your new font over to the window, your computer should say something like Installing for a brief second. You're done! Sound too good to be true? Let's make sure it worked.
Step 6: Playing with your new font. Go into Microsoft Word. Click on the drop-down box where all of your font choices are displayed. Your new font will either be the first font you see or you might have to scroll through to find your new font.
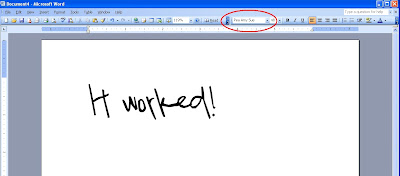
Ta Da! So now you know how to download your favorite fonts into your computer. It's pretty simple once you have done it a few times (or a hundred....but who's counting...).
So, how about you? Have any font favorites you want to share? Any tips of your own for getting your hands on a font? Do you have a go-to site for fonts? Do tell.





I love the fonts, and the process. Thanks for this great post!
ReplyDeleteHey Shanna, I know how to save all of the fonts to my computer, and when I do, they open up in all of programs EXCEPT for Blogger. I see you've used them on your blog, so how did you get them into your Blogger font options?
ReplyDeleteWould be very excited to get the answer to
this question. Thanks!
Thank you for the question, Polly!
ReplyDeleteIn order to get the fonts into Blogger, all I did was type the word or phrase (in my desired font) in Microsoft Word. I took a screen shot of the word or phrase, and then pasted the screen shot into Paint. I used the "cutting" feature in Paint to cut out only the word or phrase. I opened up a new Paint window and clicked "Paste." From here you can resize your word/phrase. Your word/phrase is technically an image, so when you click "save as," your word/phrase will be saved as am image.
Once in Blogger, you can insert an image. This "image" will actually be your previously saved word or phrase.
I have only tried using the fonts for headings, so I am not sure how well it would work for entire posts.
I have also heard that you can type your word or phrase directly into Paint. This way, you can skip the steps of typing in Word and taking a screen shot of your word or phrase.
I hope this helps! If not, I will try my best to clarify.
Shanna